HR-DIC Sample Prep
| Champion | Fan Gao |
|---|---|
| Analysis codes | - |
| Tutorials | - |
| Metadata templates | - |
HR-DIC (High Resolution Digital Image Correlation) is used to investigate the deformation behavior of materials at microstructural scale. Like macro-DIC, HR-DIC requires specific pattern distributing on the sample surface to record the movement of materials during the plastic deformation and thus acquire displacement map which can be used to plot strain map afterwards. Instead of spraying white and black paints, HR-DIC requires a gold speckle pattern homogeneously distributing on sample surface, this pattern can be achieved via gold remodeling and observed on high resolution SEM.
There are two gold remodelling methods, one uses water the other uses chemical reagent like styrene. Water remodelling is suitable for materials which are able to stand high temperature and have good corrosion resistance (e.g. Ti alloys, Ni-based superalloys, stainless steels) while chemical remodelling would be considered if materials cannot go high temperature or they are easily attacked by water (e.g. Mg alloys). Both methods will be introduced individually as follow.
WATER REMODELLING
1. Gold Deposition
Using Edwards S150B Sputter Coater (Fig.1) in B13 Morton to deposit gold onto your polished sample. Coating for 5 to 6 minutes will roughly give 20 to 30nm gold layer on your sample surface. There is a handbook right beside the coater so you can control this equipment by following the guidance step by step.
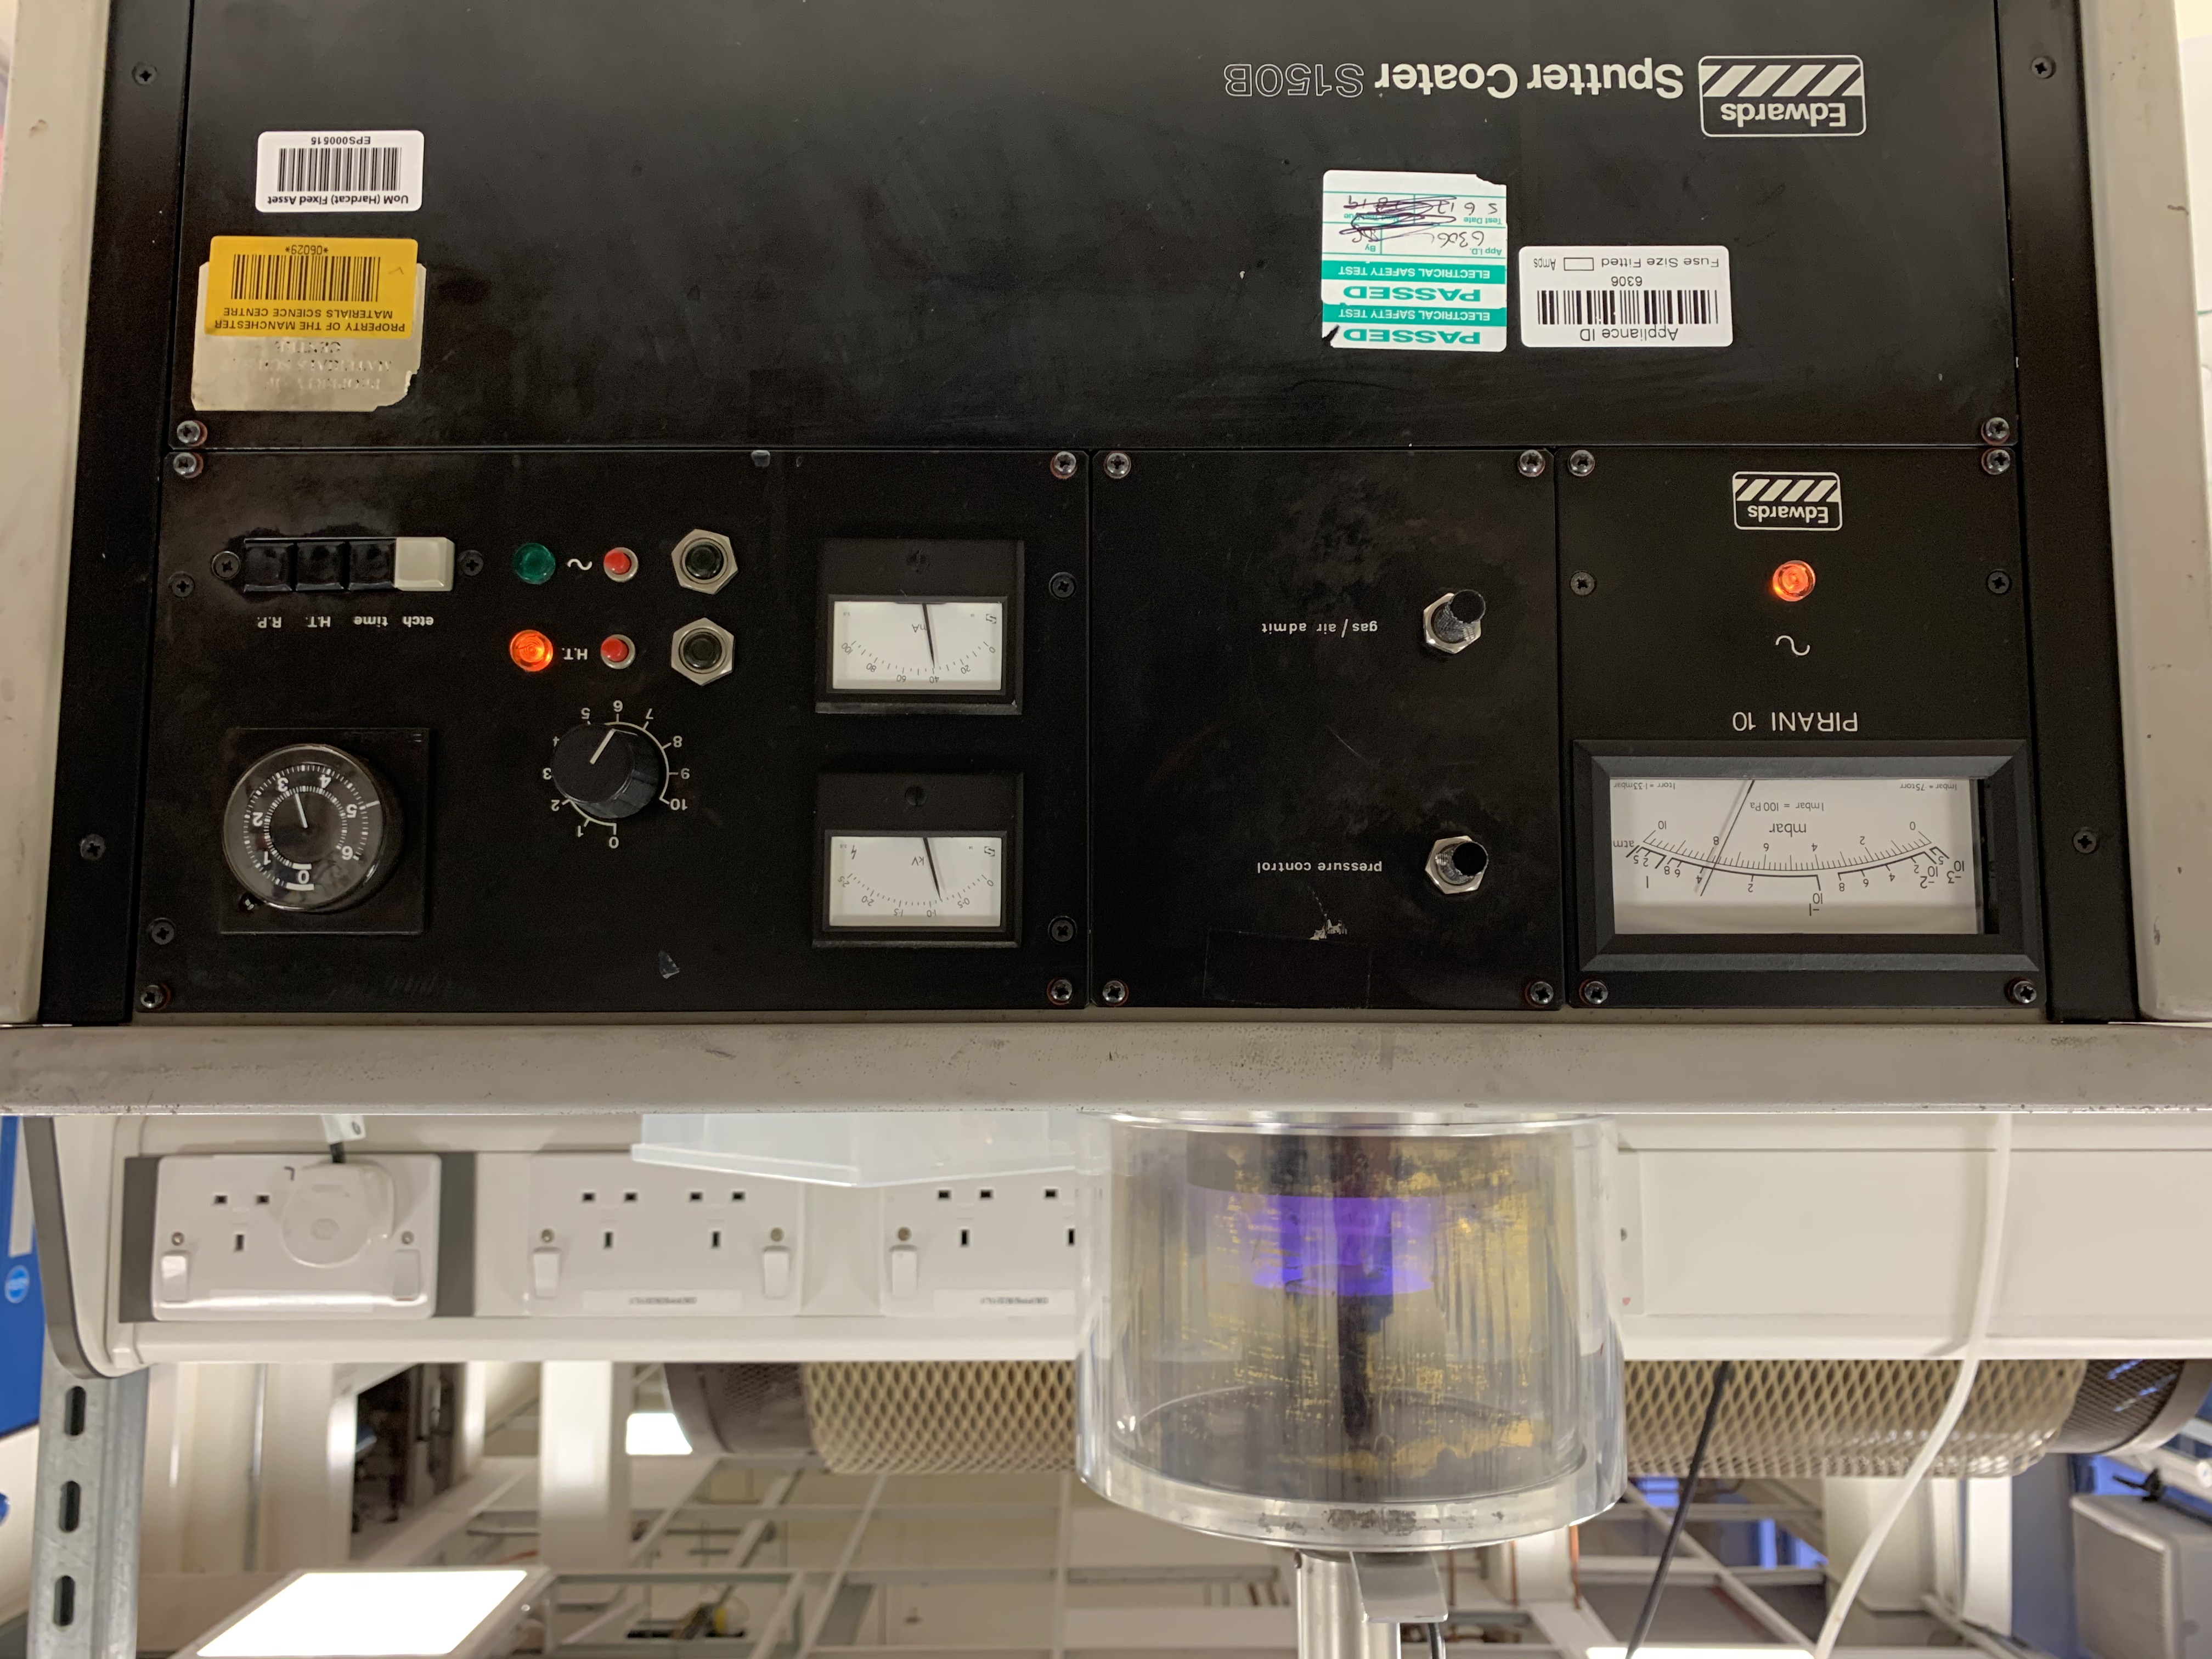
Fig.1 Edwards S150B Sputter Coater
You might want to wear nitrile gloves and use tweezer when taking your sample out of coater after gold sputtering, this is to avoid the gold layer being contaminated or scratched by fingers.
2. Gold Remodelling with Water Vapour
After gold deposition then you can put your sample into the water remodelling device. Fig.2 and Fig.3 show what the water remodelling system looks like and how it works:
- The small beaker (b) inside is the water reservoir. Filling it with about 1/3 to 2/3 cup of water prior to heating up (Do not fill it full in case of overflow when boiling).
- Hot plate is at the bottom of the remodelling system, it is used to evaporate the water and heat your sample up to the remodelling temperature. For materials like Ti alloys, Ni-based superalloys and stainless steels, the remodelling temperature is usually between 250 to 280C.
- The large beaker (a) outside is the remodelling chamber, it is used to maintain the density of water vapour at the certain level and assure the samples are always in contact with fresh and hot vapour. Your sample is put on the hot plate between the large and small beakers (see Fig.2 or Fig.3 top view).
- You might need to refill the small beaker (b) with water for few times during your remodelling. Wear heatproof gloves when you are doing so and be careful not to get yourself hurt by steam. There is a kettle near the remodelling device, try to use it to provide hot water when refilling, cold water could possibly crack the beaker once it has been heated up to 250C.
- Remodelling time is around 3.5 to 4 hours, this can finally provide a homogeneous distribution of gold pattern with the average speckle size around 50 to 100nm (Fig.7a, b and c).
- Turn off hot plate after remodelling. Wear heatproof gloves and use tweezer to take your sample out from remodelling chamber and put it aside for cooling down. Do not rinse hot beakers with cold water immediately, let them cool down for a bit and dry them.
- For safety reason, leave a note to keep other people away from the hot plate when it is cooling down.
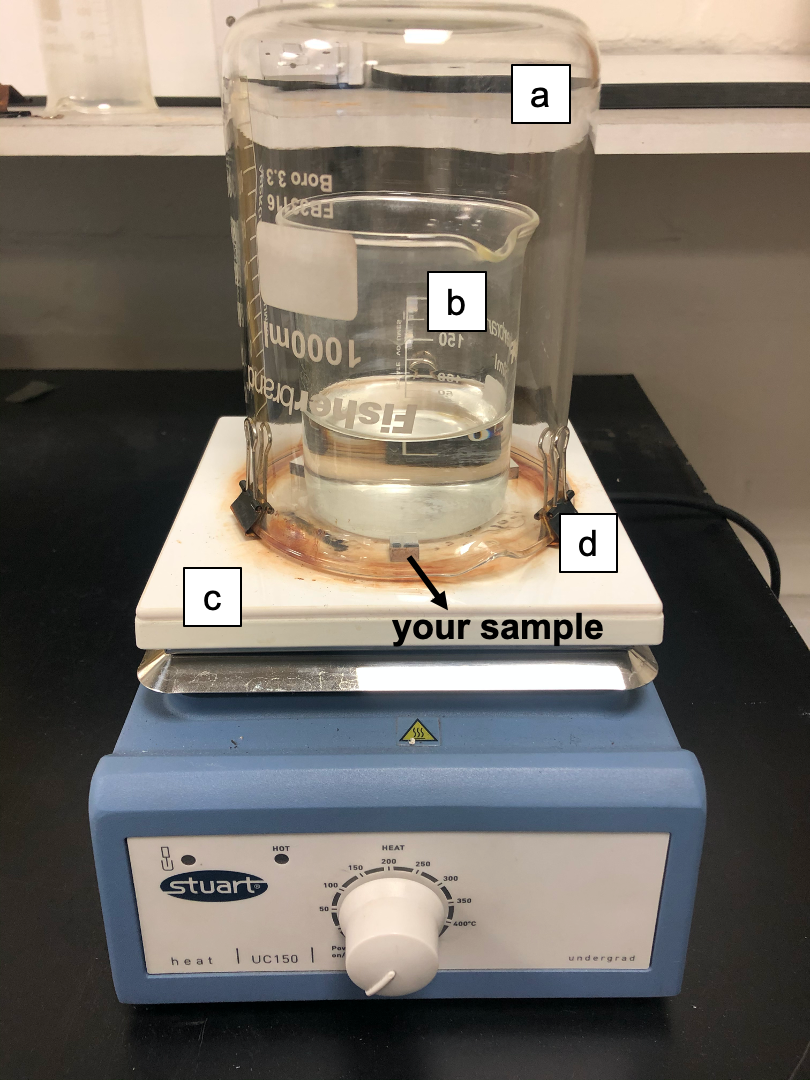
Fig.2 Water remodelling system: (a) remodelling chamber, (b) water reservoir, (c) hot plate, (d) cup holder
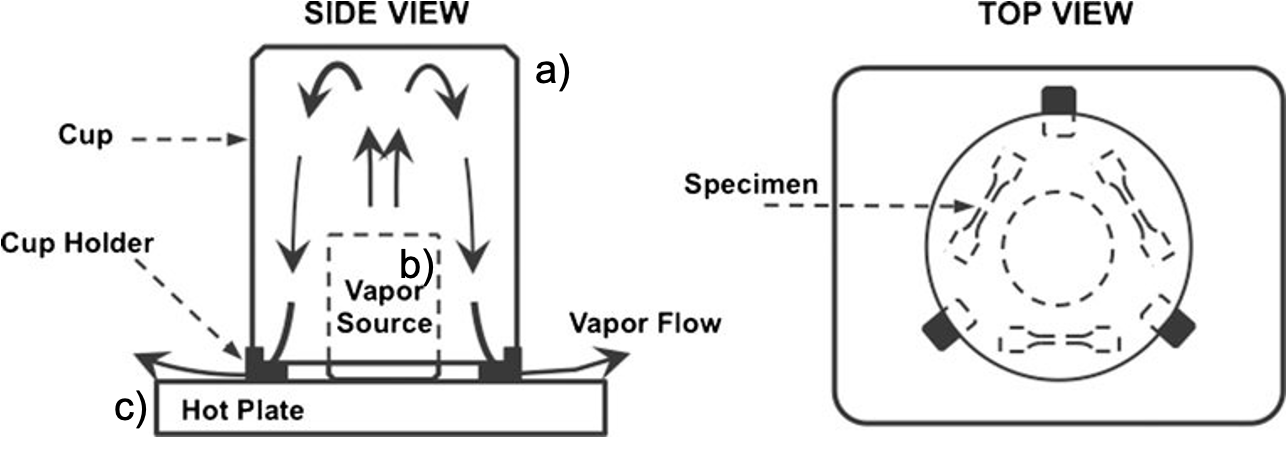
Fig.3 Schematic of water remodelling system: a) remodelling chamber, b) water reservoir, c) hot plate [1]
For more details about how to use water remodelling device safely please do refer to the risk assessment form placed on Dropbox
CHEMICAL/STYRENE REMODELLING
1. Gold Deposition
Using Quorum Q150T Coater (Fig.4) in sample prep room of EM centre to provide gold film onto your polished sample. This is an equipment which allows you to control the thickness of the gold film. To our best knowledge, 5nm is the ideal thickness for samples to get fully remodelled by styrene vapour within 30 hours. Again, there is a manual near the coater which can lead you step by step on how to use this machine.
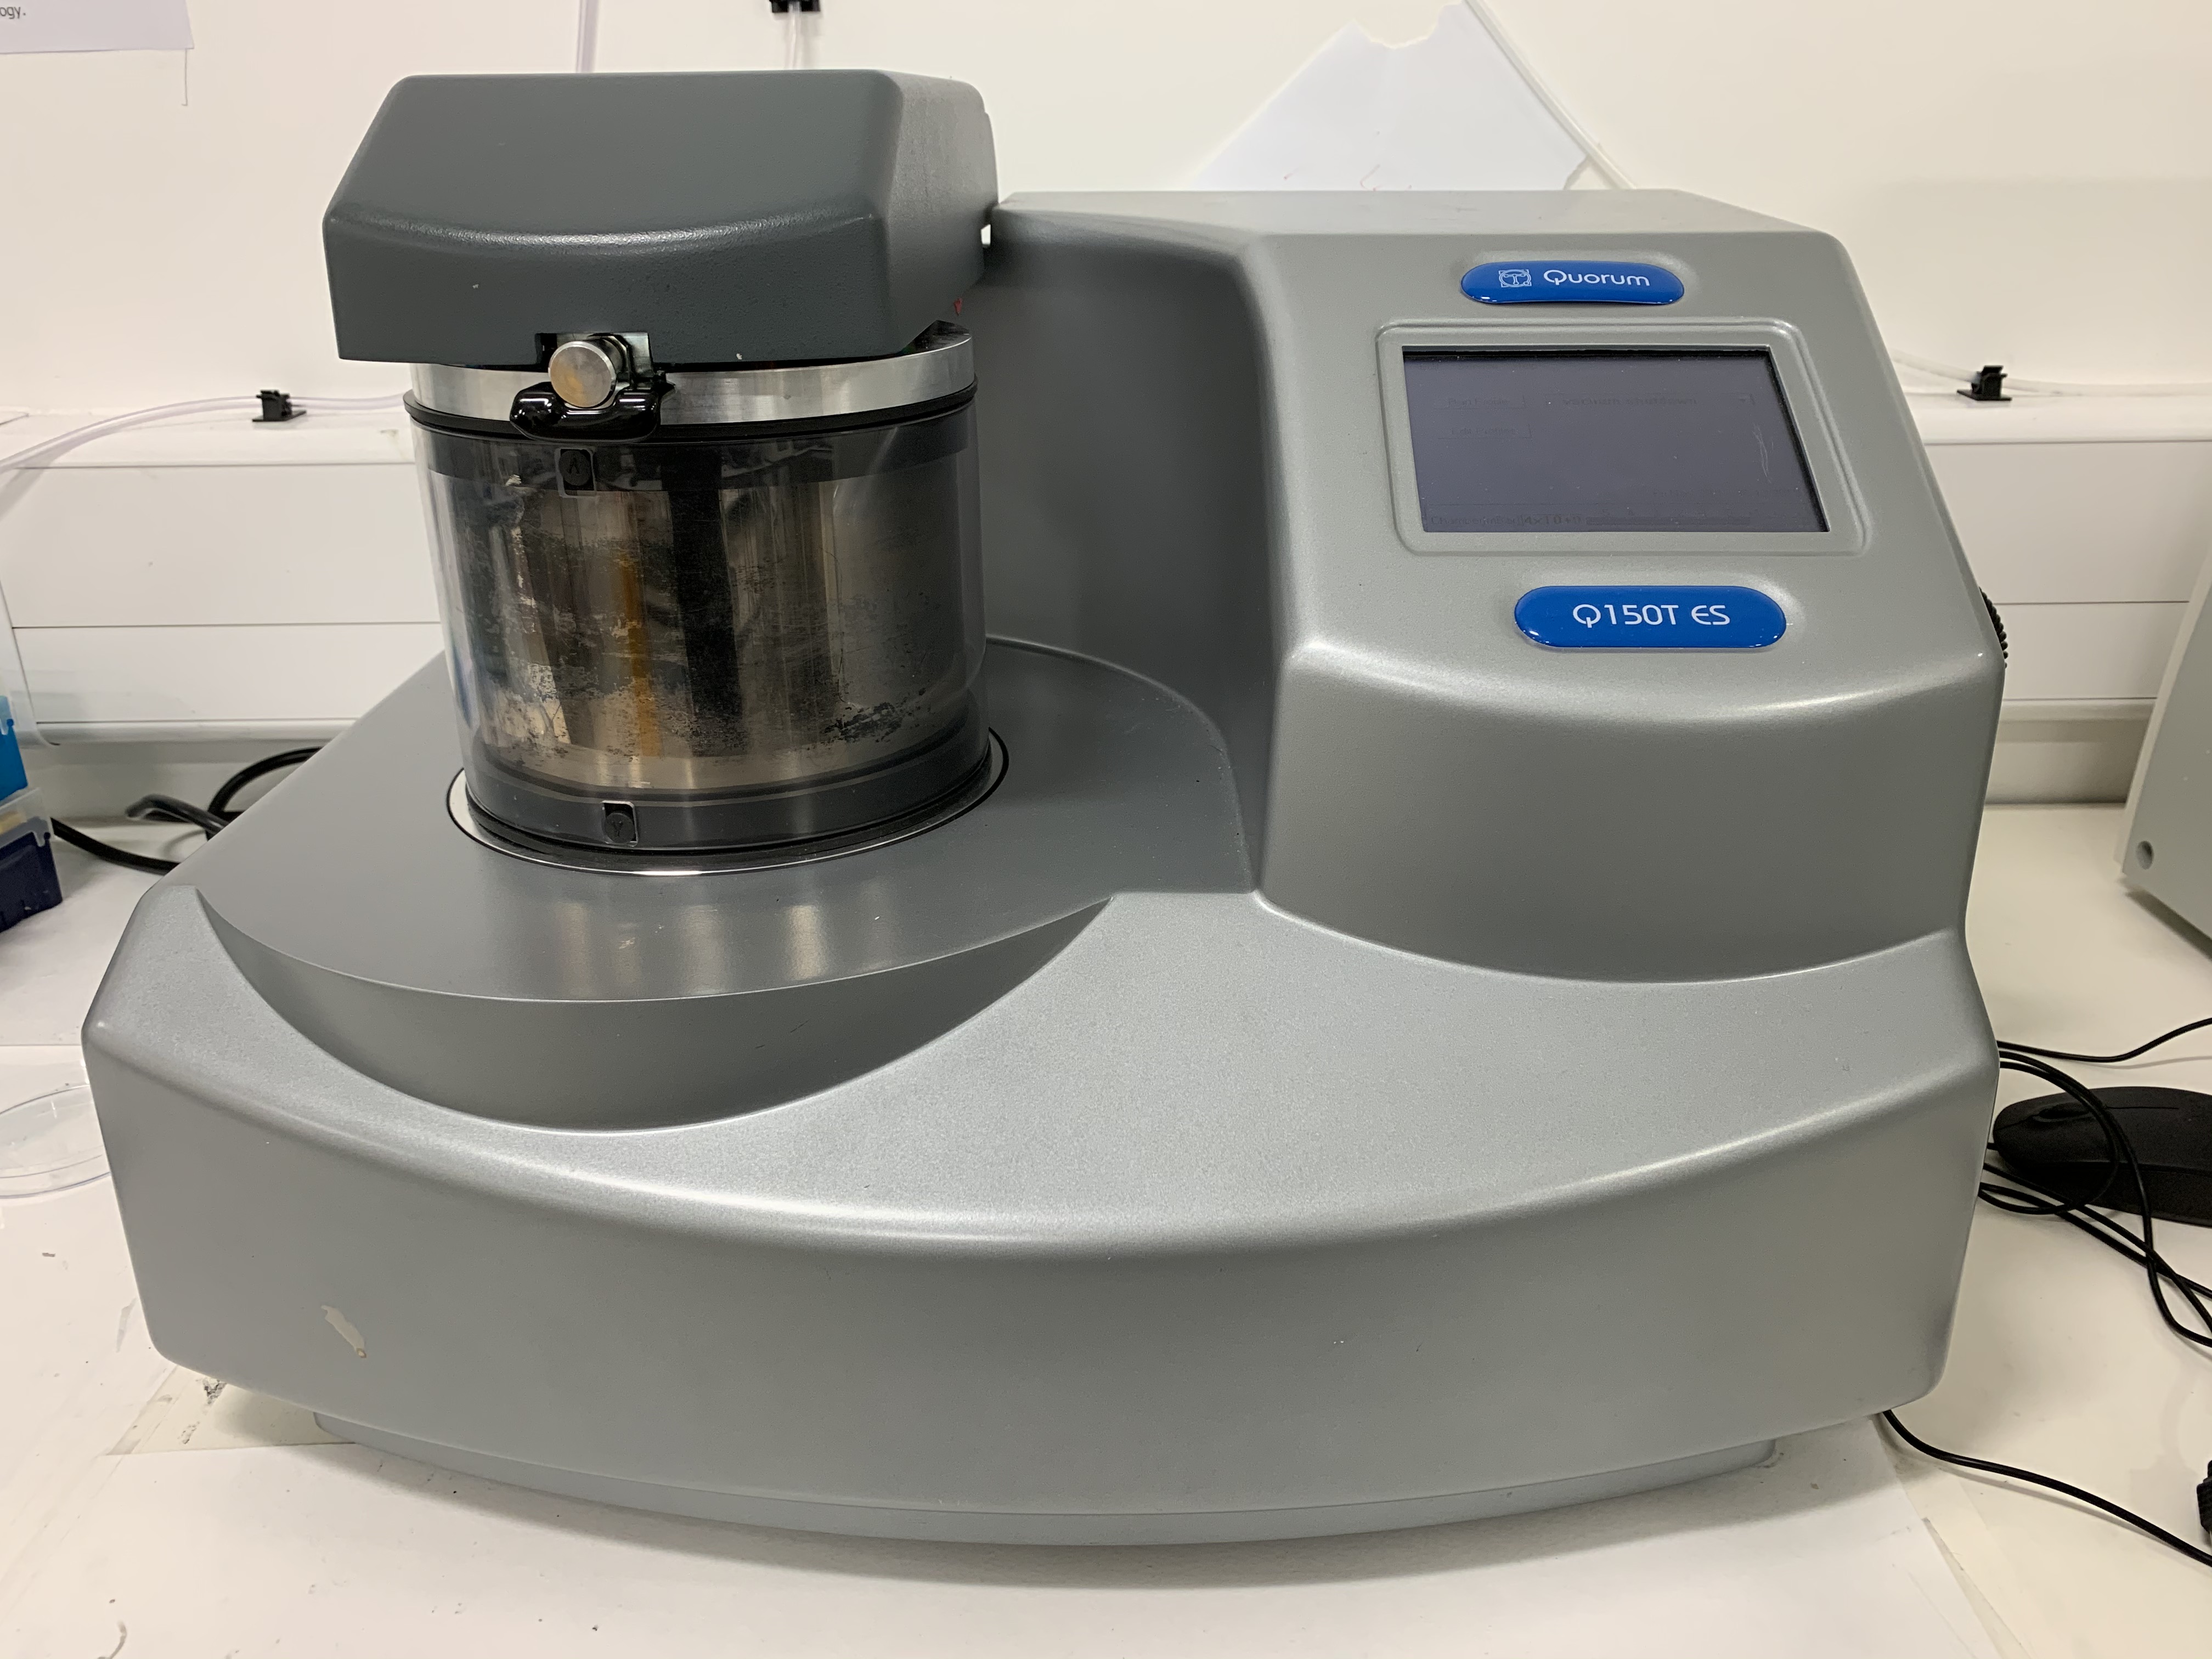
Fig.4 Quorum Q150T Coater
By the way, the default target material mounted in the coater is Au/Pd [80:20] so you need to change it to gold target before coating. You can borrow the gold target from Anjali and remember to return it back after your coating work. If you don’t know how to switch to the gold target, Anjali or Michael might be able to help (please note your request might not be accepted until face-to-face assistance is available).
Again, wear nitrile gloves and use tweezer when taking your sample out of coater after gold deposition.
2. Gold Remodelling with Styrene Vapour
Your gold coated sample is now ready to be chemically remodelled by styrene vapour. As styrene might cause biohazard and irritation if it contacts with skins and eyes or is inhaled accidentally, therefore, this remodelling work is only allowed to be carried out in a fume cupboard. Safety spectacle, lab coat, mask and nitrile gloves must be worn to prevent yourself from being contaminated. Fig.5 and Fig.6 illustrate what the styrene remodelling system looks like and how it works:
- First, switch on the ventilator and raise up the sash (Do not over the limited height).
- Open the lid of exhaust chamber (d), remove the remodelling chamber (e) and then put your sample onto the hot plate (f).
- Put the remodelling chamber back and close the lid of exhaust chamber.
- Turn on the argon flow: Turn on the gas controller (a) first by twisting the black knob counterclockwise, this is in case argon piles up in the plastic tube and also avoids a sudden change of gas pressure. Then turn on the black valve and white knob slowly (shown in Fig.5h) to provide argon. Argon will then pass through the styrene reservoir (b) and carry styrene vapour to remodel your sample. Make sure the gas pressure is not higher than 10psi, this can be monitored via the pressure gauge on the wall. The styrene rate is better between 1.5 to 2 bubbles per second, this can be manipulated by adjusting the gas controller (a).
- Down the sash and let the argon flow run for about 40 minutes to exhaust the air in the chamber.
- Set up remodelling temperature: First press the large green button on heater (c) to turn it on, then hold the other two green buttons ★ and ▲ (under the panel) simultaneously to set your remodelling temperature. Remodelling temperature is related to your material and the gold film thickness deposited on your sample surface – higher temperature usually means faster remodelling speed but it might also lead an unwanted grain growth. For magnesium alloy like AZ31 or ZEK100 with 5nm gold film on it, 210C manages to get a good remodelling result. Once you’ve set up your remodelling temperature, turn on the sliver switch in the middle of the heater, you now should see a red flash which indicates the temperature of hot plate is heating up to your set value.
- Remodelling time is, again, related to your material and the thickness of gold film coated on your sample, it is also affected by remodelling temperature. In the case of magnesium alloy AZ31 or ZEK100, the best remodelling time is around 25 hours, this can create an evenly distributed gold pattern with average speckle size approximately 20 to 40nm (Fig.7d). If you have other materials for example Al or Zr alloys then you have to find out you own remodelling parameters.
- Once your remodelling work has been done, set the temperature down to RT by holding ★ and ▼ buttons at the same time. It’ll then take one or two hours for your sample to cool down to RT. Real-time temperature will be displayed on the panel.
- When the temperature drops down to RT, raise up sash, open the lid of exhaust chamber (d), remove the remodeling chamber (e), take your sample out, put the remodeling chamber back and close the lid.
- Turn off the sliver switch on heater (c) and then press the large green button again to turn off the heater.
- Switch off the black valve on the wall to cut off the argon flow. Twist the black knob on the gas controller (a) counterclockwise a bit to let the residual gas out. When there are no running bubbles in styrene reservoir, switch off the white knob on the wall.
- Down the sash.
- Let the ventilator work for another 5 to 10 minutes and then turn it off.
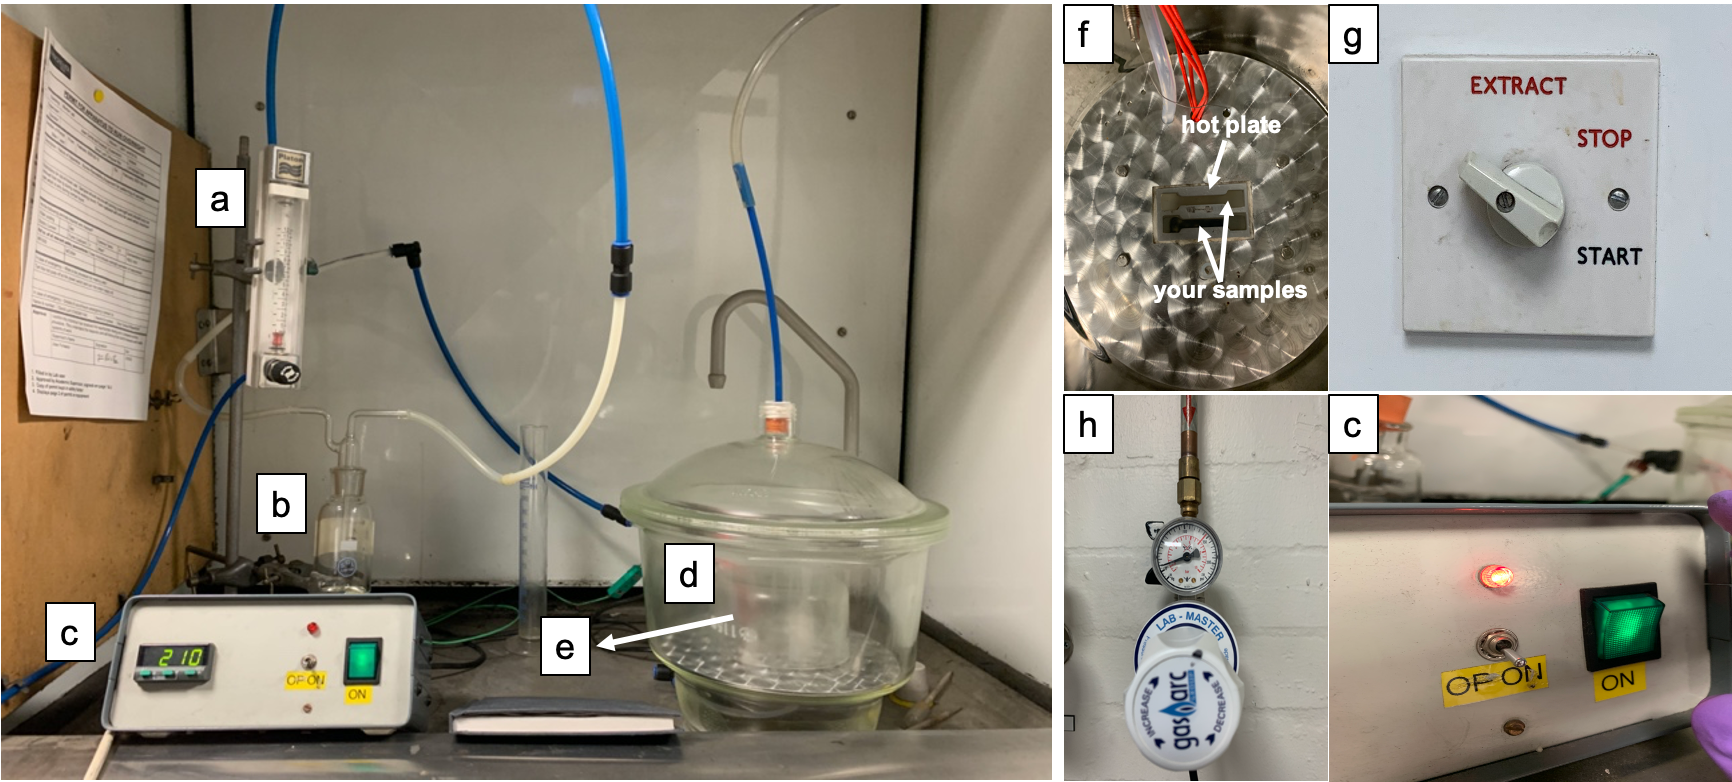
Fig.5 Chemical/Styrene remodelling system: (a & h) argon flow controller, (b) styrene reservoir, (c) heater, (d) exhaust chamber, (e) remodelling chamber, (f) hot plate, (g) ventilator switch

Fig.6 Schematic of chemical/styrene remodelling system: a) argon flow controller, b) styrene reservoir, c) heater, d) remodelling vessel [2]
For more details about how to use styrene remodelling device safely please do refer to the risk assessment form placed on Dropbox
Once your sample has been gold remodelled then you can check the speckle pattern on high resolution SEM such as Q650, Tescan Mira3 or Magellan etc. by using the BSE mode as gold with high atomic number is able to provide good contrast under BSE. 20kv with 10mm WD or 10kv with 5mm WD are both okay for taking images, can also try other parameters. Magnification is related to the speckle size you’ve got – basically small gold speckle requires higher magnification while large speckle means lower magnification because you need to make sure that there are no less than 3 pixels in each gold speckle so that might possibly provide you a better correlation result afterwards. We also suggest each sub-image (tile) to be overlapped by 20% to enable an easy stitching in ImageJ. Fig.7a, b, c and d presents BSE image of the gold speckle pattern of pure Ti, Ni-based superalloy, stainless steel and Mg alloy respectively.
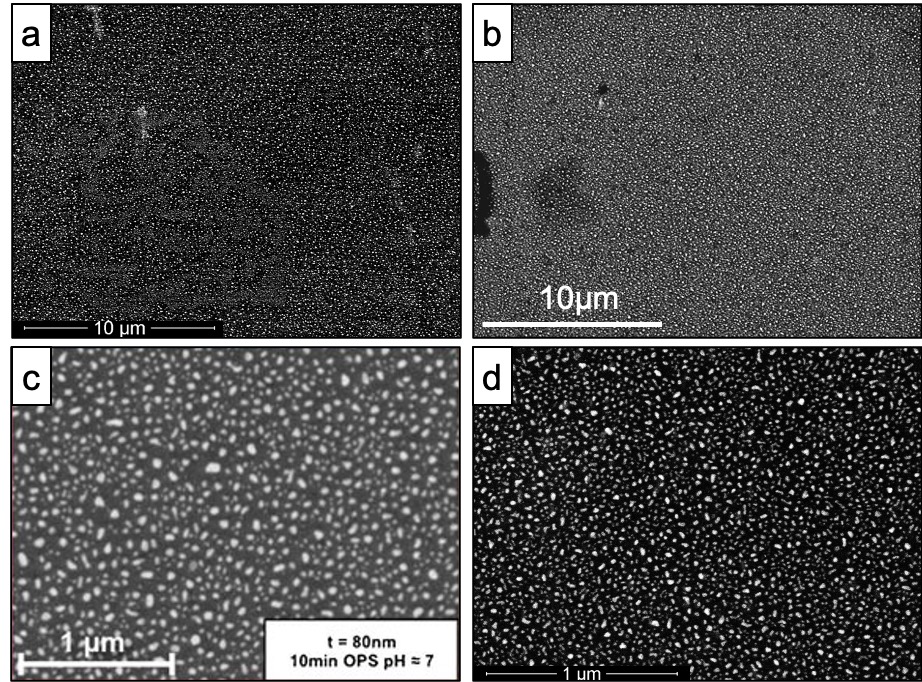
Fig.7 Gold speckle pattern BSE image of (a) pure Ti after water remodelling [3], (b) Inconel 718 (Ni-based superalloy) after water remodelling [4], (c) 304L stainless steel after water remodelling [1] and (d) ZEK100 (Mg alloy) after styrene remodelling. Image is acquired from high resolution SEM Magellan, Tescan S8000, Sirion and Q650 respectively with average speckle size for each one around 83nm (pure Ti), 70nm (Inconel 718), 56nm (304L stainless steel) and 25nm (ZEK100)
Reference
[1] F. Di Gioacchino and J. Quinta da Fonseca, “Plastic Strain Mapping with Sub-micron Resolution Using Digital Image Correlation,” Exp. Mech., vol. 53, no. 5, pp. 743–754, 2013, doi: 10.1007/s11340-012-9685-2.
[2] A. Orozco-Caballero, D. Lunt, J. D. Robson, and J. Quinta da Fonseca, “How magnesium accommodates local deformation incompatibility: A high-resolution digital image correlation study,” Acta Mater., vol. 133, pp. 367–379, 2017, doi: 10.1016/j.actamat.2017.05.040.
[3] SEM image is kindly provided by Yukun Xu.
[4] SEM image is kindly provided by Dongchen Hu.
